Risograph File Prep & FAQ

How should I prep my file?
Every project is different, so we might not be able to answer you exactly here, but we're going to try. If you still have questions, we're happy to answer them!
Our Risographs print at 300dpi, so your file should be set at this. If you're using a design or art program, you can set this under the resolution settings when you create your file. If you're scanning your artwork from paper, you can set this in your scan settings. If you are using a photo of your artwork, an HD photo setting will work.
Files accepted are PNG, JPEG, PSD (Photoshop) and PDF.
Risograph prints in different density of one color. You can use half-tones, textures and shading to create the appearance of different values but you can't actually make the ink darker.
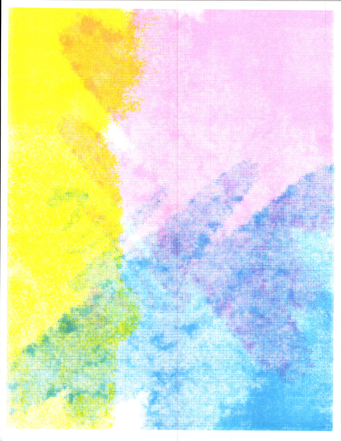
For example, this image above is done in Yellow, Fluorescent Pink and Aqua. On the far left, you'll see the area is filled with Yellow. This is the highest density that we can print with Yellow. It will not ever get darker, even if the grayscale file you send looks black. If we see in your color files that you want a darker color of Yellow, we can suggest ways to print that with combinations of colors like Orange and Yellow.
Files with layers should have each layer labeled as the color that you want on that layer. If you are submitting hand-drawn work that has not been digitized, you can submit multiple files that include the color name in each file.
Color layering! Each color is a single layer and they lay on top of each other to create secondary colors.
Naming your files helps us a lot! Please include your name and your project name in the file name.
Margins! The Risograph machines cannot print all the way to the edge of the page when using their maximum width.
We've printed a LOT of zines. It helps if you send us a PDF of what you want the layout of the zine to be, but a detailed drawing or sketch will be ok too.
Create your files at the size of paper that you want them printed. If you have a booklet or zine, please submit your files as individual pages unless you've gotten prior approval from us.
We can add half-tones to your at the machine level, which is why we ask what type of final look you would like. Our smaller machine also has a "pencil" printing option that gives a more rough look to images.
Every project is different, so we might not be able to answer you exactly here, but we're going to try. If you still have questions, we're happy to answer them!
Our Risographs print at 300dpi, so your file should be set at this. If you're using a design or art program, you can set this under the resolution settings when you create your file. If you're scanning your artwork from paper, you can set this in your scan settings. If you are using a photo of your artwork, an HD photo setting will work.
Files accepted are PNG, JPEG, PSD (Photoshop) and PDF.
- If you're designing in Procreate, please export your files as PSD if they have layers and PNG if they do not.
- If you're using an Apple device to photograph/scan, convert your files from HEIC to JPEG before sending them.
- Our priority for your files is that they show the color result you want first and, if possible, that they have a grayscale printable version. If you're confused about that or don't have the ability to switch your files to grayscale, we're happy to convert the files for you. Submitting them in color gives us an idea of the result that you want. This is important because...
Risograph prints in different density of one color. You can use half-tones, textures and shading to create the appearance of different values but you can't actually make the ink darker.
For example, this image above is done in Yellow, Fluorescent Pink and Aqua. On the far left, you'll see the area is filled with Yellow. This is the highest density that we can print with Yellow. It will not ever get darker, even if the grayscale file you send looks black. If we see in your color files that you want a darker color of Yellow, we can suggest ways to print that with combinations of colors like Orange and Yellow.
Files with layers should have each layer labeled as the color that you want on that layer. If you are submitting hand-drawn work that has not been digitized, you can submit multiple files that include the color name in each file.
Color layering! Each color is a single layer and they lay on top of each other to create secondary colors.
- The image above has only three colors printed but you can also see pink, green and orange. The Yellow was printed first, then the Fluorescent Pink, then the Aqua.
- If the Yellow had been printed last, the orange and green tones would be more intense. We will ask you questions to make sure you get the color outcome that you're looking for!
- If you're hand-drawing your work, you can create multiple colors by using a lightbox or tracing vellum to create your additional color layers.
Naming your files helps us a lot! Please include your name and your project name in the file name.
Margins! The Risograph machines cannot print all the way to the edge of the page when using their maximum width.
- If you're specifying the colors Black, Gold, Fluorescent Pink, Yellow, Aqua or Orchid, that maximum width is 8.5". There is a 1/4" margin on each side, which means the maximum your print space can be is 8". If you're specifying Bright Red, Fluorescent Orange, Violet or Teal, the maximum is 11". That means your maximum print width is 10.5".
- The margins are also applicable for the maximum length. For the smaller machine, this is 14" and printable area is 13.5". For the larger machine, this is 17" and the printable area is 16.5".
- We can print non-standard sizes as small as 4" x 6"
We've printed a LOT of zines. It helps if you send us a PDF of what you want the layout of the zine to be, but a detailed drawing or sketch will be ok too.
Create your files at the size of paper that you want them printed. If you have a booklet or zine, please submit your files as individual pages unless you've gotten prior approval from us.
We can add half-tones to your at the machine level, which is why we ask what type of final look you would like. Our smaller machine also has a "pencil" printing option that gives a more rough look to images.
